How to send texts (SMS/MMS) with Wifibooth
Wifibooth can send texts (SMS or MMS) by using the Twilio service. To do this you need to complete these steps:
- On twilio.com: create a Twilio account (if you don’t have one already), assign it at least one phone number, and add your payment information. At less than a penny per text, Twilio is very affordable – think less than $5 for a big event.
- In Wifibooth: sign-in to the Wifibooth service
- In Wifibooth: enter your Twilio credentials and the phone number, and test to make sure it works
The Wifibooth service is used as a storage depot for the files (photos, GIFs etc) that guests text to themselves. This is necessary because Twilio only sends links, not the actual files themselves. When a guest enters their phone number to send a text, first the item is uploaded to the Wifibooth service. Then, the link to that file is sent using Twilio as a text. It is important to note that files are automatically deleted from the Wifibooth Service within 30 days – guests are expected to save the photos that they like. These links are public: anyone with the link can access the photo. The usage of this service is included in the Pro package, and governed by the Terms of Use and Privacy Policy.
OK let’s get started! You only need to do this once for all of your events.
1. Create a Twilio account
Open www.twilio.com and create an account. After you create an account, that account is a trial account until you add your payment information (such as a credit card). Please note that trial accounts cannot send text/SMS to real phone numbers, so add your payment information to get started. You might find you start with $5 of credit, so you don’t actually have to pay to test it out.
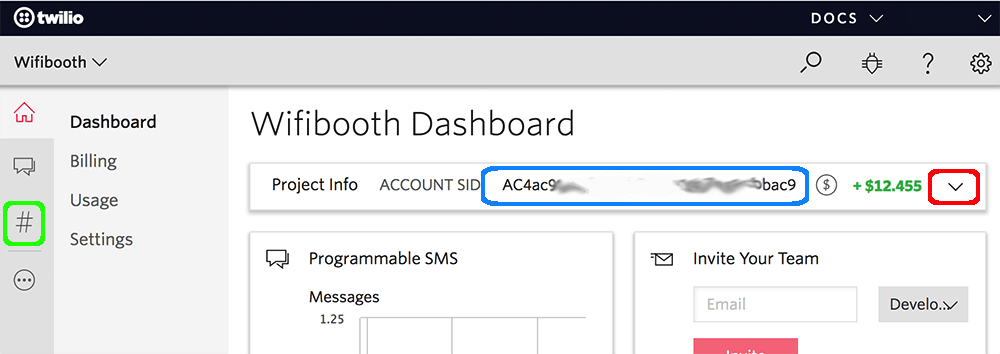
Once you’re logged in, go to the console and look for your Account SID, in the blue callout here:

Now, hit the dropdown button (red in the callout above) to expose your more project info. You’ll see that the Auth Token is hidden by default, so hit “View” to make it show up. Write down the Account SID and Auth Token, as you’ll need to enter them into Wifibooth shortly. Please note that Twilio 2FA is not currently supported by Wifibooth.
Next, go to the Phone Numbers page – use the green callout in the image above to get there. Use this page to add a phone number to your account. Make sure the number you choose is SMS capable. Write down the phone number you added.
2. Sign-in to the Wifibooth Service
In Wifibooth make sure you have direct internet access available and go to Event Settings -> Wifibooth. Hit the “Sign In” button at the top, and you’ll be prompted to enter an email address. Important: you must be able to receive the email on the same iPad that you’re on now. After you’ve entered and confirmed your email address, it will appear as nothing has happened: you need to go open that email on the same iPad and click the link. Once you click the link in the email, Wifibooth will re-open, and after a moment you’ll see that it becomes signed-in to the Wifibooth Service.
3. Configure Wifibooth Twilio Settings
In Wifibooth make sure you have direct internet access available and go to Event Settings -> Twilio. Enter the three pieces of information you wrote down: the account SID, the auth token, and the phone number. As you do this, at the bottom of the settings page you can see Wifibooth attempt to check the SID/token pair and make sure they’re correct. If you see red text, something’s gone wrong — double-check you entered the SID and token correctly.
To enable the feature, make sure you switch on “Allow Guests to send SMS”. You can also enable MMS, assuming the phone number you chose supports it. Note that sending MMS is more expensive than SMS – see Twilio’s website for pricing.
Don’t forget to test it out by using the “Try it” button! This will text a default photo to whatever phone number you choose.