Please note: The BluePrint app was renamed to SoloLink in August of 2019
SoloLink is a free app designed to work with Wifibooth. You can get it here: http://itunes.apple.com/app/id1127641254
Prefer to watch a video instead of reading? Use the Related Video link above. Note that the video refers to the older BluePrint app, which was renamed SoloLink.
Overview
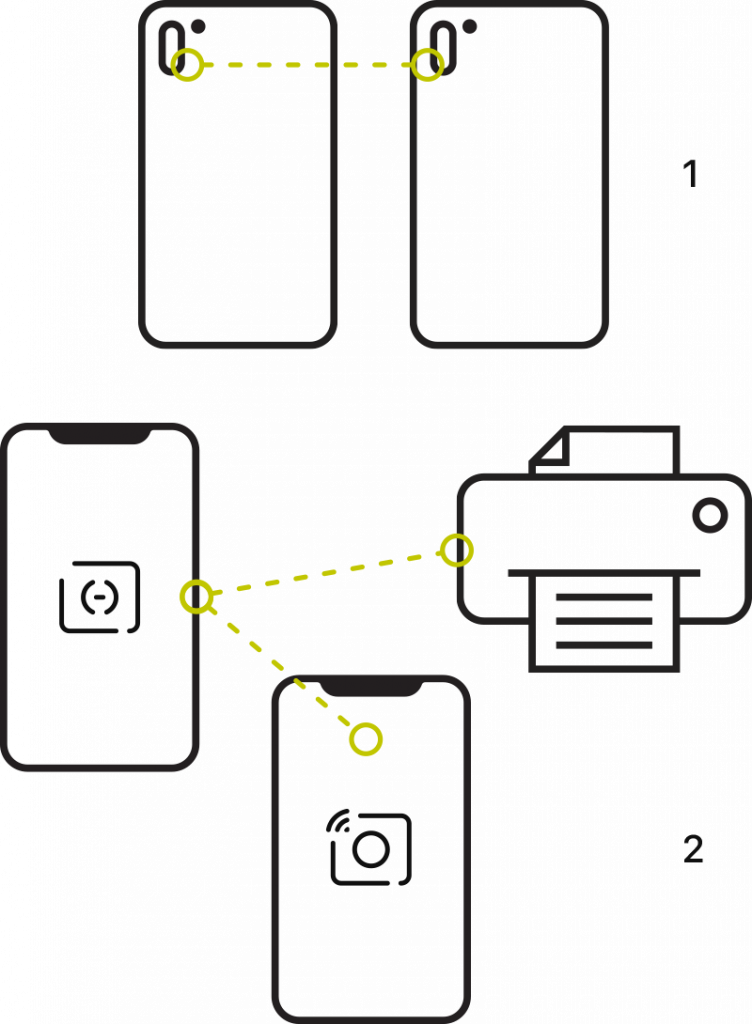
To use SoloLink you need two iOS devices: one with Wifibooth or SoloLink (2a or 2b), and one with SoloLink (1). The most common configuration is Wifibooth on an iPad (2a) and SoloLink on an iPhone (1).

With SoloLink you either share the camera to the other device (1), or, you share a printer and internet access (2).
Which?
If you want to use SoloLink to share a printer or internet access to Wifibooth (2), keep reading.
If you want to connect Wifibooth to a remote iPhone’s camera with SoloLink (1), please see this article instead.
Why?
SoloLink sharing a connected printer and internet access to Wifibooth
When the wifi of your iPad is connected directly to your camera, then by default your iPad cannot connect to a printer or use the internet. This is a common problem because only Canon and Panasonic cameras support connecting their wifi to a router (infrastructure mode). Wifibooth works with SoloLink to solve this problem. If you want to share access to a printer or the internet over Bluetooth to Wifibooth, then you must use SoloLink to do this.
When Wifibooth is connected to SoloLink, SoloLink can share its internet connectivity to Wifibooth. This means your emails, Dropbox uploads etc can happen even while your iPad is connected directly to your camera’s wifi.
Requirements
- A second iOS device with Bluetooth and wi-fi, running iOS 9.0 or newer. That’s basically any iPhone or iPod Touch that you have lying around
- If you want to connect a printer, it must support AirPrint (ie. Canon Selphy CP910 or newer) or be a DNP printer shared via a DNP WPS product; it must also be connected to the same wifi network as your second iOS device. You can also just share internet access (without a printer).
- During your event, the iPad and the second iOS device should be reasonably close together (the range of Bluetooth varies, but I wouldn’t expect much beyond about 5 meters or so)
Steps for sharing your Printer and Internet access from SoloLink to Wifibooth
- Make sure Bluetooth is turned on, on both your iPad and your second iOS device. You don’t need to connect to anything, or do anything other than make sure Bluetooth is on.
- Install SoloLink on your second iOS device. Do not install SoloLink on the same device where Wifibooth is installed. That is not supported. Here’s the app-store link for SoloLink: http://itunes.apple.com/app/id1127641254
- If you are connecting a printer with SoloLink, then connect the wifi of your SoloLink device to the same wifi your printer is on. If your SoloLink device is an iPhone, then it is best to use your iPhone’s Personal Hotspot feature and get the printer connected to that. You can tell if the printer is connected to your iPhone’s Personal Hotspot by opening the Personal Hotspot from the Settings App.
- Start SoloLink. If you intend to share internet connectivity to Wifibooth, and you are using the Wifibooth Service (for example, to send text/SMS messages with Twilio), then you must sign in to the Wifibooth Service in the SoloLink app with the same email address you used in the Wifibooth app.
- In SoloLink touch the appropriate Share button — if applicable share your printer, otherwise share Internet. Sharing a printer also shares the internet. If the app cannot find your printer, make sure the printer is on the same wifi network as your SoloLink device.
- Open Wifibooth on your iPad, open the status area (the wifi icon) near the top-right, and touch “To start connecting to SoloLink, touch here”. When prompted with the question “What are you sharing from SoloLink?”, touch the button “Anything Else” to answer. The status area will close itself.
- Within a few moments the status area should pop open again because it has found your SoloLink device, and prompt you to connect. If this doesn’t happen, make sure Bluetooth is turned on for both devices, and make sure the devices are reasonably close to each other.
- That’s it! If you shared a printer, Wifibooth will automatically add it as the connected printer.
Too slow? Try these tips to make it faster
First, make sure the distance between the two devices with Wifibooth/SoloLink is not too far: aim for 3m or less.
Next, try to remove all obstacles between the two devices (especially dense/moist material like MDF/wood).
If that still doesn’t do it then there are 2 major ways you can speed up printing and internet uploads in Wifibooth when it is connected to SoloLink.
Upgrade both devices to Bluetooth 5
With each major revision of Bluetooth, there are significant speed increases. From Bluetooth version 4 to 5 you could see as much as double the speed. You’ll only get this speed if both devices are Bluetooth 5 (there’s no advantage in only one side supporting Bluetooth 5). On the iPad side, this requires a newer iPad like the iPad Pro 11″. On the iPhone side an iPhone 8 or newer has Bluetooth 5. If in doubt just look at the technical specifications for your iOS device on Apple’s website. There is no way to upgrade the Bluetooth version of a device (it is stuck on whatever it comes with).
Reduce the amount of data that Wifibooth sends to SoloLink
If you don’t require it, turn off SoloLink’s internet sharing (on the printer sharing screen). This will cause Wifibooth to store its internet uploads for later (they’ll automatically upload when Wifibooth detects direct internet access). This will considerably reduce the amount of data being sent over the Bluetooth link, thus speeding up printing via SoloLink.
You should also reduce the print DPI by going to Event Settings, Layout & Collages, and reducing the dots per inch (DPI) — try going from 300 to 150. This will lead to slightly reduced print quality, but you might not even be able to notice it — and you’ll be sending half as much data, ie. a speed boost of 2x.
How Wifibooth and SoloLink handle queueing
When SoloLink is connected to Wifibooth, Wifibooth will always use the internet connection it has through SoloLink first. If you’re uploading a lot (ie. Dropbox uploads turned on, Email on, etc) and printing a lot at the same time, you might find that the prints take a while to get sent. Wifibooth does prioritize the prints ahead of any other uploads (prints jump to the front of the queue), but Wifibooth does not interrupt an upload-in-progress when a print is ordered. SoloLink caches photos that it receives, so if someone prints a photo a second time, it is not retransmitted across the Bluetooth link.
What happens if there’s a bunch of stuff being sent by Wifibooth to SoloLink, and at the same time someone prints another photo? Wifibooth and SoloLink handle this by queueing items. In order to make Wifibooth reliable, this queue is tough: it can handle the Bluetooth connection being lost and then reconnected, or one side disappearing – for example your iPhone runs out of battery, you plug it in, and start up SoloLink again. This queue will automatically resume once a connection is (re)established. Please note that the contents of this queue cannot be viewed — it is not the same as what you see on the Event Picker screen.
If you get stuck, please visit the Community — someone will help you!