Archive for October, 2018

How to send texts (SMS/MMS) with Wifibooth

Wifibooth can send texts (SMS or MMS) by using the Twilio service. To do this you need to complete these steps:

  1. On twilio.com: create a Twilio account (if you don’t have one already), assign it at least one phone number, and add your payment information. At less than a penny per text, Twilio is very affordable – think less than $5 for a big event.
  2. In Wifibooth: sign-in to the Wifibooth service
  3. In Wifibooth: enter your Twilio credentials and the phone number, and test to make sure it works

The Wifibooth service is used as a storage depot for the files (photos, GIFs etc) that guests text to themselves. This is necessary because Twilio only sends links, not the actual files themselves. When a guest enters their phone number to send a text, first the item is uploaded to the Wifibooth service. Then, the link to that file is sent using Twilio as a text. It is important to note that files are automatically deleted from the Wifibooth Service within 30 days – guests are expected to save the photos that they like. These links are public: anyone with the link can access the photo. The usage of this service is included in the Pro package, and governed by the Terms of Use and Privacy Policy.

OK let’s get started! You only need to do this once for all of your events.

1. Create a Twilio account

Open www.twilio.com and create an account. After you create an account, that account is a trial account until you add your payment information (such as a credit card). Please note that trial accounts cannot send text/SMS to real phone numbers, so add your payment information to get started. You might find you start with $5 of credit, so you don’t actually have to pay to test it out.

Once you’re logged in, go to the console and look for your Account SID, in the blue callout here:


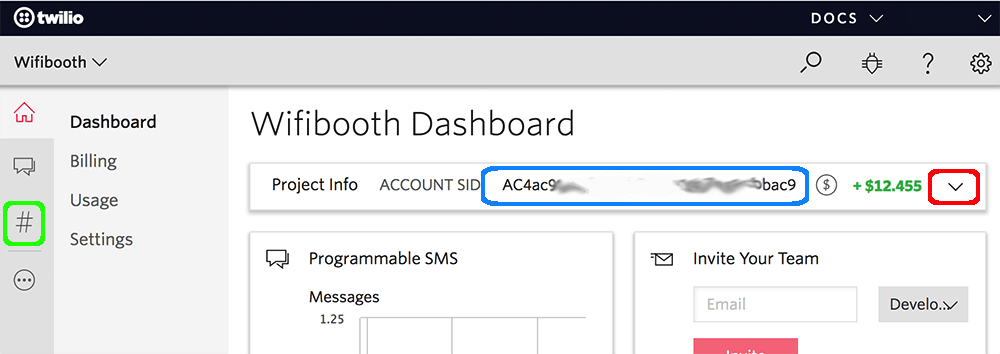
Now, hit the dropdown button (red in the callout above) to expose your more project info. You’ll see that the Auth Token is hidden by default, so hit “View” to make it show up. Write down the Account SID and Auth Token, as you’ll need to enter them into Wifibooth shortly. Please note that Twilio 2FA is not currently supported by Wifibooth.

Next, go to the Phone Numbers page – use the green callout in the image above to get there. Use this page to add a phone number to your account. Make sure the number you choose is SMS capable. Write down the phone number you added.

2. Sign-in to the Wifibooth Service

In Wifibooth make sure you have direct internet access available and go to Event Settings -> Wifibooth. Hit the “Sign In” button at the top, and you’ll be prompted to enter an email address. Important: you must be able to receive the email on the same iPad that you’re on now. After you’ve entered and confirmed your email address, it will appear as nothing has happened: you need to go open that email on the same iPad and click the link. Once you click the link in the email, Wifibooth will re-open, and after a moment you’ll see that it becomes signed-in to the Wifibooth Service.

3. Configure Wifibooth Twilio Settings

In Wifibooth make sure you have direct internet access available and go to Event Settings -> Twilio. Enter the three pieces of information you wrote down: the account SID, the auth token, and the phone number. As you do this, at the bottom of the settings page you can see Wifibooth attempt to check the SID/token pair and make sure they’re correct. If you see red text, something’s gone wrong — double-check you entered the SID and token correctly.

To enable the feature, make sure you switch on “Allow Guests to send SMS”. You can also enable MMS, assuming the phone number you chose supports it. Note that sending MMS is more expensive than SMS – see Twilio’s website for pricing.

Don’t forget to test it out by using the “Try it” button! This will text a default photo to whatever phone number you choose.

How to Connect to your Camera

This article is about connecting an external camera to your iPad/iPhone. You can also connect from your iPad to an iPhone, to use the iPhone’s camera – read more here.

Is your Camera Supported?

Please check the list of supported cameras to make sure the camera you are using is supported by Wifibooth.

Watch the video!

Use the Related Video link at the top-right of this article.

Optimal iPad Settings

Make sure your iPad is fully charged, and plugged in. When the battery is low, iOS can throttle the wifi, which causes disconnections, lags, poor live view performance, and all kinds of other issues. Even if the iPad is plugged in, a low battery can still cause all of these issues. Turn on wifi, and bluetooth also! Make sure low power mode is turned off (if your device supports it — most iPads do not), and check that you have lots of free storage space (>500MB).

When was the last time your iPad was turned all the way off? If you can’t remember, do it now: hold down the power button, swipe -> off, then turn it back on again. This is especially helpful if you experience connectivity issues (to the camera, or from remotes).

Is your iPad in a case? Take it out and see if it performs better! Cases have a negative impact on wifi. How much negative impact depends on the case, so experiment without it and see if you get better performance.

Optimal Camera Settings

Use a fast memory card, not your old crummy one! Wifibooth hammers your camera with requests as fast as it can handle, to prevent your event guests waiting for the camera. A slower memory card can cause your camera to get confused and drop requests, resulting in missed photos in the app.

Start with a formatted memory card for best results! Wifibooth will connect to your camera faster if there are just a few photos on the card (ie. format it, then take one photo).

Panasonic & Olympus camera users: you must take at least one photo after formatting the card, or, make sure there’s at least one photo already on the camera.

If you experience the camera continually connecting & disconnecting: try formatting the card, taking one photo manually (using the camera not the app), then connect to Wifibooth

Use manual focus if possible, especially on the Canon 1300D aka T6. Autofocus failures can lead to long delays (stuck on the pink circle / donut screen) and can make people think the app has crashed. If your camera has unreliable autofocus performance (Canon 1300D, low-end DSLRs like the Nikon D3000 series, certain mirrorless cameras), then autofocus should be avoided. You need to turn off autofocus in two places: on the camera (ie. set the lens or camera to MF), and in Wifibooth (in the event settings -> taking photos, turn off autofocus). The Canon 1300D will often fail to take any photo when there is just a hint of focus ambiguity, so for this camera autofocus should be turned off.

If you are using autofocus, choose a focus point on the camera where there is high contrast, such as where people’s faces will be, or where a bright area meets a dark area. If you’re testing wifibooth on your desk, make sure you point the camera at a real subject that’s a proper distance from the camera.

Super huge photos will crash your iPad, so use JPG ‘Small’ or ‘Medium’. Make sure your camera is set to store JPGs at a size as close to your printing resolution as possible, which is by default 1800 x 1200 pixels (6″ paper size width x 300DPI = 1800 pixels width). It is safe to set your camera to store both RAW+JPG – RAW files will not be downloaded. With RAW+JPG you still have the originals, and Wifibooth is able to process the JPGs quickly.

Getting your camera ready for wifi

If you have already connected your mobile phone or iPad to your camera using your camera’s official app, then you already know this procedure. The difference is that you might need to instruct your camera to allow a new app to connect (ie. forget the last connection to the official app). If you have never connected your camera to an app before, then please consult the documentation that came with your camera to learn how to do this. Your camera should be waiting for a connection.

If you have a Fuji camera and you experience problems connecting, then turn the camera OFF, turn it back on again, open wireless mode on the camera, and once the camera is waiting for a connection hit the ‘MENU/OK’ button to forget the last pairing. You might need to do this even if Wifibooth was the last app that connected.

If you have a Canon or Panasonic camera, then you have the choice of having the camera connect to a wifi hotspot or router (“infrastructure mode”), or, you can connect the wifi of your iPhone or iPad to the camera (“camera mode”). Please note that infrastructure mode is highly recommended. Canon users, please read more hereTo get to infrastructure mode on a Panasonic, while the camera is showing the wifi animation and is expecting a connection, at the bottom you should see “DISP. Change method”. Hit the Disp. button, then choose “via network”.

If you have a Sony camera, then you almost certainly need to update the firmware and the smart remote app in order for wifibooth to be able to connect. Please note that updating the firmware and the smart remote app are two separate steps. Sony users, please read more here

Connecting Wifibooth to your camera

First, connect the wifi of your iOS device to either the camera directly (all camera models except Canon), or to the same router/hotspot that your camera is connected to (Canon cameras in infrastructure mode)

Next, open Wifibooth and touch the camera icon at the top-left of the start screen:

In the camera popup, double-check that the wifi is connected to where you expect it to be. Then, touch the “Camera with Wifi” option:

Wifibooth will look for cameras continuously while the “Camera with Wifi” option is selected. Please note that you might need to complete the pairing on the camera, ie. your camera may ask you if Wifibooth should be allowed to connect.

Nikon camera users: sometimes it can take longer (1-2 minutes) than expected for the initial connection to some Nikon cameras, notably the Nikon D750.

If you still have trouble connecting, please follow these steps: Go to Settings App -> Wifibooth, turn on the setting “Slow camera”. Restart Wifibooth (if it is running, kill it), then try to connect Wifibooth again. This is necessary for some cameras, notably Fuji cameras such as the Fuji X-T30.

If you see an error message from Wifibooth, such as the session being rejected by the camera, just wait a minute — Wifibooth will automatically try again. If you experience issues, switch the camera back to the device camera, then back to “Camera with Wifi” again.

Once connected, you can use the small camera button in the camera popup to take a test photo. Test photos are not saved.

If your camera gets disconnected, ie. because you have to swap the battery, Wifibooth should automatically reconnect.

Using SoloLink with Wifibooth to connect your iPhone camera to your iPad

Please note: The BluePrint app was renamed to SoloLink in August of 2019

SoloLink is a free app designed to work with Wifibooth. You can get it here: http://itunes.apple.com/app/id1127641254

Prefer to watch a video instead of reading? Use the Related Video link above. Note that the video refers to the older BluePrint app, which was renamed SoloLink.

Overview

To use SoloLink you need two iOS devices: one with Wifibooth or SoloLink (2a or 2b), and one with SoloLink (1). The most common configuration is Wifibooth on an iPad (2a) and SoloLink on an iPhone (1).

With SoloLink you either share the camera to the other device (1), or, you share a printer and internet access (2).

Which?

If you want to connect Wifibooth to a remote iPhone’s camera with SoloLink (1), keep reading.
If you want to use SoloLink to share a printer or internet access to Wifibooth (2), please see this article instead.

Why?

SoloLink sharing an iPhone camera to Wifibooth on an iPad

A rear-facing iPhone camera is much higher quality than any iPad camera. For this reason alone, using the iPhone camera remotely from the iPad makes sense. But if you have an iPhone with dual cameras (iPhone 8+ or newer), you can also use SoloLink to create effects like green screen (aka magic screen), where the background is replaced even without having a professional/green backdrop behind the guests.

Requirements

  • iOS 12 or newer on both your iPad & iPhone
  • SoloLink installed on your iPhone. It’s free, no sign-up required. App store link: http://itunes.apple.com/app/id1127641254
  • Keep both apps, SoloLink and Wifibooth, updated to the newest versions available on the App Store

To connect your iPhone & iPad:

  1. First, either connect both devices to the same wifi network, or have the iPad connect to your iPhone’s personal hotspot (this will also mean the iPad has internet access, which is necessary for live emails / uploads). Your iPad & iPhone will also connect to each other if wifi is on and both devices are not connected to any network.
  2. On your iPad, in Wifibooth, open the camera popup (near the top-left of the app), and select “Remote iPhone”
  3. On your iPhone, open SoloLink and touch the button to share the camera
  4. Your iPad will find the iPhone and attempt to connect. Your iPhone will ask you for permission for the iPad to connect: grant it with “Always Allow”

That’s it!

On your iPhone, SoloLink offers you the following features:

  • Green Screen effect (replaces the background with a different background). Note that this is only supported on dual-camera devices at least as new as the iPhone 8 Plus, ie. iPhone 8 Plus, iPhone X, iPhone XS, iPhone XS Max or newer. To activate this feature, hit the “Select…” button to choose a new background image. Note: the green-screen effect will only be applied when a person’s face is detected in the frame, and the lighting is good
  • Video resolution: choose the resolution of the live-view feed being sent to your other device. This has no effect on the photos taken. If you experience issues with the live-view / video feed looking blocky or breaking up, then lower the resolution to 480.
  • Flash: choose whether the iPhone flash will fire when a photo is taken
  • Exposure controls: you can lock or unlock the exposure (so that the camera doesn’t change its brightness), and also apply an exposure compensation to make it brighter or darker
  • Save photos to camera roll: by default, all photos taken will be saved to the camera roll on your iPhone. If you don’t want this, set it to “No”.

To conserve your iPhone’s battery, SoloLink will detect when it hasn’t taken a photo in a while, and reduce the frame-rate of the live-video it is sending. As soon as another photo is asked to be taken, or you interact with Wifibooth’s camera controls on the other end, the frame-rate will be reset to its normal rate.