Author Archive

Issues with Canon Cameras not firing Flash

Do you have a flash (or remote trigger) connected to the hotshoe of your Canon camera, and all of a sudden it isn’t firing? That’s due to a peculiarity in the way Canon has built their Live View. You have 2 options with Wifibooth, depending on which Canon camera you have.

Canon Cameras: REBEL series

If you have a REBEL series Canon camera including the 750D and 760D (aka T6i, T6s), and you need to shoot with a flash, then you must have adequate lighting during the countdown sequence or you’ll have a very dark liveview. This is because these cameras do not support having a different exposure setting for the liveview and for the photo. You can also disable live-view in Wifibooth (event settings -> Taking Photos).

Canon Cameras: mid-to-high end

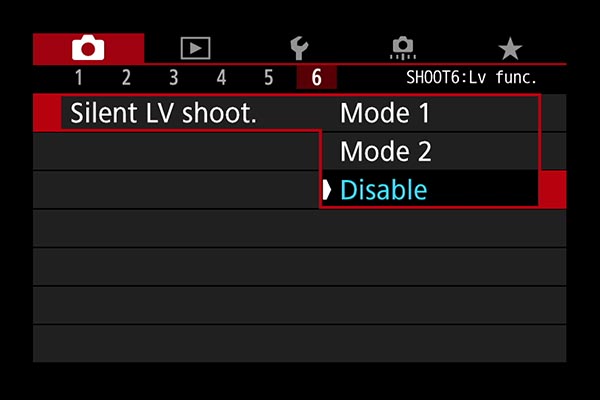
If you have a Canon 60D, 7D, or other mid/high-end Canon, then you can use Canon Live View with WiFi Booth and flash as well — all you have to do is disable a setting on your camera called “Silent LV shoot.” (older cameras like 40/50/60D: instead by enabling the camera setting “exposure simulation”). Here’s a photo of the setting you need to change. If you cannot find it, please consult your Canon manual to learn how to disable silent live-view shooting (there is mode1, mode2, and disable; you want “disable”).

There is more information here: https://martybugs.net/blog/blog.cgi/gear/lights/Triggering-Flashes-While-Using-LiveView.html, and here: https://photo.stackexchange.com/questions/95333/how-to-fire-an-external-flash-in-liveview-mode-on-a-canon-77d

Guests can trigger the iPad by using the app on their iPhone/iPod

When Wifibooth is running on an iPhone or iPod, it is automatically looking for iPads running Wifibooth that are nearby. All you need to do is make sure that bluetooth and wifi are turned on (see below).

Use your iPhone/iPod to control the iPad

Sorry, there’s no Android version available. iOS 9.0 or newer is required.

Using your iPhone/iPod/Apple Watch, you can trigger the iPad, get the photos, and even fill in your email address and print too!

Connecting your iPhone / iPod / Watch to the iPad

When you first start Wifibooth on your iPhone/iPad/Watch, it will immediately start trying to connect to Wifibooth on an iPad. It uses bluetooth to connect, so bluetooth must be turned on. You will see a warning if bluetooth is not turned on, in which case turn it on by swiping up from below the screen, and touching the Bluetooth button:

You don’t need to connect bluetooth or wi-fi to anything, or enter any information — connection is automatic. If you cannot connect, try moving closer to the iPad as the range of Bluetooth can be limited by radio interference.

Press the Button to take a Photo!

Once connected, press the big red button in the middle of the screen to instruct the iPad to take a photo.

Downloading your Photos

You can only download photos that were taken when you triggered the camera with your iPhone/iPod/Watch:

  • After you trigger a photo, it is sent to your iPhone/iPod/Watch immediately afterwards

On your iPhone/iPod, Photos are saved to the Camera Roll. To get to them, open the Apple Photos app and look for an album called Wifibooth.

If you are using the Apple Watch, please note that Photos are only saved on your iPhone (not on the Watch). If you experience problems with the Watch, please make sure your first use the iPhone to take & save one photo before trying the Watch again.

How to Connect your Sony using Built-in Wi-Fi

This article will help you use your Sony camera’s built-in “Smart Remote” app to connect with Wifibooth.

Update Smart Remote app

To connect to your Sony camera, your Sony camera must be running the built-in Sony app called “Smart Remote”. This app does not get updated when you update your camera’s firmware, and brand-new Sony cameras ship with out-of-date apps (so yes, you DO need to update Smart Remote). Updating the Smart Remote app is out of the scope of this article but here are some hints: some Sony cameras, like the a6300, can update the Sony Smart Remote app directly on the camera itself. Others like the A7 II require a computer to be connected. To use Wifibooth with your Sony camera, please first make sure you update Smart Remote. Consult your manual for further details, or use one of these links to learn more: Brian Smith’s Installing and Updating Sony Apps, and Colby Brown’s Installing and Updating Apps on your Sony Camera.

Steps

  1. On your camera, start the Smart Remote app. You already updated it, right?
  2. Connect your iPad’s wifi to your camera, using the instructions on the screen. On most Sony cameras the wifi password is not shown by default. You can show it by pressing the Trash button (while on the wifi start screen of the Smart Remote app)
  3. Start Wifibooth on the iPad, and choose Built-In Wifi
  4. After a few moments, you’ll see Wifibooth connect to your Sony camera
  5. On the camera, hit the Menu button, and double-check that the camera is configured to only shoot JPG photos (no RAW). Also make sure you are not sending gigantic 30MP files over, as that would make your iPad work very hard to downsize the photos. Choose a resolution as close to 1800 x 1200 pixels as possible (assuming you are printing 4×6 and you left this as the default print resolution chosen in the Settings app -> Wifibooth)
  6. Start taking photos on your Sony camera, and the photos automatically appear in the app! You can also trigger the camera with the red shutter button

If you want to print while the wifi of your iPad is connected to your Sony camera, then you need a second iOS device to share the printer using the free app SoloLink (formerly called BluePrint). You can read how to configure Wifibooth to work with SoloLink here.

Are you stuck? Please ask for help in the Wifibooth Community!

How to write an App Store review for Wifibooth!

Please write a review for Wifibooth on the Apple App store!  Indie developers like me really need people like you to review their apps. It greatly increases the chances that my app will be found by people searching the app store.

To write a review:

  1. On your iOS device, open the Apple App Store app
  2. Search for “wifibooth” and open it, or, click this link: http://itunes.apple.com/app/id946775424
  3. Go to the Reviews pane (see the red callout in the image below)
  4. Touch “Write a Review” (see the red callout in the image below)
  5. Choose a number of stars and write a review! Of course i’m hoping you pick 5 stars, but please leave a genuine review and tell me how you feel about the app.

Wifibooth + DNP printers with DNP WPS

Do you own a DNP WPS product like the WPS-1 or the WPS PRO, with a supported DNP printer connected to it like the DS40, DS80, RX1, or DNP DS620 (or any other printer the WPS unit supports)? Then you can configure Wifibooth to print to your DNP printer! The reason the WPS unit is required is because DNP printers do not have wifi, they only have a USB cable connection.

Configuring the DNP WPS is out of the scope of this article, but the good news is that it should work with just the default settings of the DNP WPS. To configure Wifibooth to print to DNP WPS, follow these steps:

  1. Make sure the DNP WPS is powered on, ready, with a supported printer connected & powered on, and your network connection(s) are connected so that the iPad can communicate to the DNP WPS
  2. Open Wifibooth and go to the settings screen (cog icon at top-right of main screen), and touch the Printers button. If you get a popup warning that FTP printing is on, turn this off in the Settings App before continuing
  3. Wifibooth will attempt to automatically locate your DNP WPS on the network. If it cannot, you will be prompted to enter the IP address of the WPS unit. You can enter an IP address or a hostname (if you configured your WPS unit to have a hostname). Note that if Wifibooth reports that your WPS unit doesn’t have any printers connected or is not ready, but the printer appears to be connected, then this means that you need to reboot your WPS unit.
  4. A list of print queues provided by the WPS unit will popup. Select the queue that corresponds to the print configuration you want.
  5. The paper size in the event settings screen will have been automatically changed to match the required size of the print queue you selected. However, if you chose a strip-cut queue (such as 2x2x6), then you must now go to the event settings screen, and select “2 Strips” printing

… that’s it!

How to Connect your Canon using Built-In WiFi

This article will help you connect everything with your Canon camera. Don’t connect your devices directly to the camera, because then you won’t have internet access for Dropbox and other functionality.

Recommended: Using a Wireless Router

If you have a dedicated wireless router that you can connect everything to (including portable 3G units like MiFi), then it is easy:

  1. Make sure that the iPad’s wifi is connected to the router you will connect everything to
  2. Start the WiFi Booth app and hit “Built-In Wifi”. Leave the app running.
  3. On the Canon, turn on wifi. Here’s where to find it:
  4. While turning on wifi, you need to make a choice of the wifi mode. Choose smartphone mode. That’s the top-middle one:
  5. Make sure you connect the camera in infrastructure mode to the same wifi network that the iPad is connected to. You can choose auto IP settings.
  6. After a few moments (in rare cases, it can take up to a minute or two!), the app automatically finds the camera and asks to connect to it. On the camera, you’ll see that WiFi Booth is requesting to connect. Hit OK to allow connection. Your camera will save these settings so that next time all you have to do is turn on the camera, and start wifi and the rest is automatic. Only after you’ve accepted the initial connection on the camera (once) does the app show that the camera is connected.
  7. Configure your camera to save JPG (either only JPG, or JPG+RAW; the app will not download RAW files), and make sure the resolution is not too high. Remember, printing resolution is only 1800×1200 pixels in most cases, so more is overkill and just makes your iPad drain its battery faster. If photos arriving on the iPad are huge, you’ll get a warning.
  8. Photos you take will automatically appear in the app. You can trigger the camera manually (ie. with a radio trigger), or use the iPad to trigger the camera, or use the iPhone/Watch app to trigger the camera.
  9. Get your printers on the same wifi network, and add them in the app’s settings screen. Done!

Using an iPhone’s Personal Hotspot

If you have an iPhone that can use the Personal Hotspot feature, then:

  1. Turn on Personal Hotspot on the iPhone. Leave the iPhone on the Personal Hotspot screen while you configure or connect devices — see the section below for why.
  2. Connect your iPad’s wifi to the iPhone’s Personal Hotspot
  3. Connect your printer(s) wifi to the Personal Hotspot. At this point your iPhone no longer has to be on the Personal Hotspot screen.
  4. Start the WiFi Booth app and hit “Built-In Wifi”. Leave the app running.
  5. On the Canon, turn on wifi. Here’s where to find it:
  6. While turning on wifi, you need to make a choice of the wifi mode. Choose smartphone mode. That’s the top-middle one:
  7. Make sure you connect the camera in infrastructure mode to the same wifi network that the iPad is connected to. You can choose auto IP settings.
  8. After a few moments (in rare cases, it can take up to a minute or two!), the app automatically finds the camera and asks to connect to it. On the camera, you’ll see that WiFi Booth is requesting to connect. Hit OK to allow connection. Your camera will save these settings so that next time all you have to do is turn on the camera, and start wifi and the rest is automatic. Only after you’ve accepted the initial connection on the camera (once) does the app show that the camera is connected.
  9. Configure your camera to save JPG (either only JPG, or JPG+RAW; the app will not download RAW files), and make sure the resolution is not too high. Remember, printing resolution is only 1800×1200 pixels in most cases, so more is overkill and just makes your iPad drain its battery faster. If photos arriving on the iPad are huge, you’ll get a warning.
  10. Photos you take will automatically appear in the app. You can trigger the camera manually (ie. with a radio trigger), or use the iPad to trigger the camera, or use the iPhone/Watch app to trigger the camera.

Tip: Ensure the blue bar at the top of your iPhone (Personal Hotspot) is always showing at least 1 device connected (ie. your iPad, or 2 if you have a printer as well). As soon as nothing is connected, the Personal Hotspot is no longer reachable — even if Personal Hotspot is still ‘on’. See the section below for details.

Using the WiFi Booth iPad’s Personal Hotspot

Otherwise, if the iPad that runs WiFi Booth can use the Personal Hotspot feature (requires the iPad to have a SIM card), and you have at least one other device that can stay connected to the iPad’s Personal Hotspot all the time (like a Canon Selphy printer) in order to keep it active, then:

  1. Turn on Personal Hotspot on the iPad. Leave the iPad on the Personal Hotspot screen while you configure or connect devices — see the section below for why.
  2. Connect a wireless device to the iPad which will stay connected, like a Canon Selphy printer. You can use an iPhone to hold the connection open too, but iPhones eventually drop their wireless connection if they are not used for some time, so be careful. Once you’ve done this, the iPad doesn’t have to stay on the Personal Hotspot screen anymore.
  3. If you didn’t already, connect your printer(s) wifi to the iPad’s Personal Hotspot
  4. Start the WiFi Booth app and hit “Built-In Wifi”. Leave the app running.
  5. On the Canon, turn on wifi. Here’s where to find it:
  6. While turning on wifi, you need to make a choice of the wifi mode. Choose smartphone mode. That’s the top-middle one:
  7. Make sure you connect the camera in infrastructure mode to the same wifi network that the iPad is connected to. You can choose auto IP settings.
  8. After a few moments (in rare cases, it can take up to a minute or two!), the app automatically finds the camera and asks to connect to it. On the camera, you’ll see that WiFi Booth is requesting to connect. Hit OK to allow connection. Your camera will save these settings so that next time all you have to do is turn on the camera, and start wifi and the rest is automatic. Only after you’ve accepted the initial connection on the camera (once) does the app show that the camera is connected.
  9. Configure your camera to save JPG (either only JPG, or JPG+RAW; the app will not download RAW files), and make sure the resolution is not too high. Remember, printing resolution is only 1800×1200 pixels in most cases, so more is overkill and just makes your iPad drain its battery faster. If photos arriving on the iPad are huge, you’ll get a warning.
  10. Photos you take will automatically appear in the app. You can trigger the camera manually (ie. with a radio trigger), or use the iPad to trigger the camera, or use the iPhone/Watch app to trigger the camera.

Tip: Ensure the blue bar at the top of your iPad (Personal Hotspot) is always showing at least 1 device connected (ie. your printer). As soon as nothing is connected, the Personal Hotspot is no longer reachable — even if Personal Hotspot is still ‘on’. See the section below for details.

Are you stuck? Please ask for help in the WiFi Booth Community!

iPad/iPhone Personal Hotspot Feature

It’s a simple feature right? Well… no! Here are some gotchas:

  • The Personal Hotspot feature only works when a SIM card is inserted
  • Your SIM card provider (your cellular provider) can disable Personal Hotspot so that you cannot turn it on. So if you can’t find this option, that might be why!
  • When there are no wireless connections to your iPad/iPhone, then a new wireless connection will only be accepted if the iPad/iPhone is on the Personal Hotspot screen (ie. where the switch to turn Personal Hotspot on/off is located). If some other app is open (like WiFi Booth), and there are no wireless connections to your personal hotspot, then new incoming wireless connections will be rejected.
  • When there is at least one existing wireless connection to your iPad/iPhone, then a new wireless connection will be accepted no matter what screen or app the device is showing. This means that a device which is constantly wirelessly connected (like a Canon Selphy printer) can “hold open” the Personal Hotspot feature, so that other devices can connect. Note that the existing connection must be a wireless one — just having the iPad/iPhone connected to a computer etc will not do it