Author Archive

How to Connect to your Camera

This article is about connecting an external camera to your iPad/iPhone. You can also connect from your iPad to an iPhone, to use the iPhone’s camera – read more here.

Is your Camera Supported?

Please check the list of supported cameras to make sure the camera you are using is supported by Wifibooth.

Watch the video!

Use the Related Video link at the top-right of this article.

Optimal iPad Settings

Make sure your iPad is fully charged, and plugged in. When the battery is low, iOS can throttle the wifi, which causes disconnections, lags, poor live view performance, and all kinds of other issues. Even if the iPad is plugged in, a low battery can still cause all of these issues. Turn on wifi, and bluetooth also! Make sure low power mode is turned off (if your device supports it — most iPads do not), and check that you have lots of free storage space (>500MB).

When was the last time your iPad was turned all the way off? If you can’t remember, do it now: hold down the power button, swipe -> off, then turn it back on again. This is especially helpful if you experience connectivity issues (to the camera, or from remotes).

Is your iPad in a case? Take it out and see if it performs better! Cases have a negative impact on wifi. How much negative impact depends on the case, so experiment without it and see if you get better performance.

Optimal Camera Settings

Use a fast memory card, not your old crummy one! Wifibooth hammers your camera with requests as fast as it can handle, to prevent your event guests waiting for the camera. A slower memory card can cause your camera to get confused and drop requests, resulting in missed photos in the app.

Start with a formatted memory card for best results! Wifibooth will connect to your camera faster if there are just a few photos on the card (ie. format it, then take one photo).

Panasonic & Olympus camera users: you must take at least one photo after formatting the card, or, make sure there’s at least one photo already on the camera.

If you experience the camera continually connecting & disconnecting: try formatting the card, taking one photo manually (using the camera not the app), then connect to Wifibooth

Use manual focus if possible, especially on the Canon 1300D aka T6. Autofocus failures can lead to long delays (stuck on the pink circle / donut screen) and can make people think the app has crashed. If your camera has unreliable autofocus performance (Canon 1300D, low-end DSLRs like the Nikon D3000 series, certain mirrorless cameras), then autofocus should be avoided. You need to turn off autofocus in two places: on the camera (ie. set the lens or camera to MF), and in Wifibooth (in the event settings -> taking photos, turn off autofocus). The Canon 1300D will often fail to take any photo when there is just a hint of focus ambiguity, so for this camera autofocus should be turned off.

If you are using autofocus, choose a focus point on the camera where there is high contrast, such as where people’s faces will be, or where a bright area meets a dark area. If you’re testing wifibooth on your desk, make sure you point the camera at a real subject that’s a proper distance from the camera.

Super huge photos will crash your iPad, so use JPG ‘Small’ or ‘Medium’. Make sure your camera is set to store JPGs at a size as close to your printing resolution as possible, which is by default 1800 x 1200 pixels (6″ paper size width x 300DPI = 1800 pixels width). It is safe to set your camera to store both RAW+JPG – RAW files will not be downloaded. With RAW+JPG you still have the originals, and Wifibooth is able to process the JPGs quickly.

Getting your camera ready for wifi

If you have already connected your mobile phone or iPad to your camera using your camera’s official app, then you already know this procedure. The difference is that you might need to instruct your camera to allow a new app to connect (ie. forget the last connection to the official app). If you have never connected your camera to an app before, then please consult the documentation that came with your camera to learn how to do this. Your camera should be waiting for a connection.

If you have a Fuji camera and you experience problems connecting, then turn the camera OFF, turn it back on again, open wireless mode on the camera, and once the camera is waiting for a connection hit the ‘MENU/OK’ button to forget the last pairing. You might need to do this even if Wifibooth was the last app that connected.

If you have a Canon or Panasonic camera, then you have the choice of having the camera connect to a wifi hotspot or router (“infrastructure mode”), or, you can connect the wifi of your iPhone or iPad to the camera (“camera mode”). Please note that infrastructure mode is highly recommended. Canon users, please read more hereTo get to infrastructure mode on a Panasonic, while the camera is showing the wifi animation and is expecting a connection, at the bottom you should see “DISP. Change method”. Hit the Disp. button, then choose “via network”.

If you have a Sony camera, then you almost certainly need to update the firmware and the smart remote app in order for wifibooth to be able to connect. Please note that updating the firmware and the smart remote app are two separate steps. Sony users, please read more here

Connecting Wifibooth to your camera

First, connect the wifi of your iOS device to either the camera directly (all camera models except Canon), or to the same router/hotspot that your camera is connected to (Canon cameras in infrastructure mode)

Next, open Wifibooth and touch the camera icon at the top-left of the start screen:

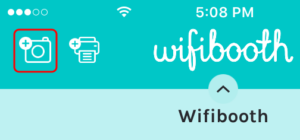
In the camera popup, double-check that the wifi is connected to where you expect it to be. Then, touch the “Camera with Wifi” option:

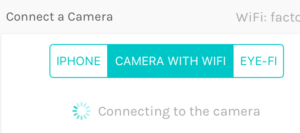
Wifibooth will look for cameras continuously while the “Camera with Wifi” option is selected. Please note that you might need to complete the pairing on the camera, ie. your camera may ask you if Wifibooth should be allowed to connect.

Nikon camera users: sometimes it can take longer (1-2 minutes) than expected for the initial connection to some Nikon cameras, notably the Nikon D750.

If you still have trouble connecting, please follow these steps: Go to Settings App -> Wifibooth, turn on the setting “Slow camera”. Restart Wifibooth (if it is running, kill it), then try to connect Wifibooth again. This is necessary for some cameras, notably Fuji cameras such as the Fuji X-T30.

If you see an error message from Wifibooth, such as the session being rejected by the camera, just wait a minute — Wifibooth will automatically try again. If you experience issues, switch the camera back to the device camera, then back to “Camera with Wifi” again.

Once connected, you can use the small camera button in the camera popup to take a test photo. Test photos are not saved.

If your camera gets disconnected, ie. because you have to swap the battery, Wifibooth should automatically reconnect.

Using SoloLink with Wifibooth to connect your iPhone camera to your iPad

Please note: The BluePrint app was renamed to SoloLink in August of 2019

SoloLink is a free app designed to work with Wifibooth. You can get it here: http://itunes.apple.com/app/id1127641254

Prefer to watch a video instead of reading? Use the Related Video link above. Note that the video refers to the older BluePrint app, which was renamed SoloLink.

Overview

To use SoloLink you need two iOS devices: one with Wifibooth or SoloLink (2a or 2b), and one with SoloLink (1). The most common configuration is Wifibooth on an iPad (2a) and SoloLink on an iPhone (1).

With SoloLink you either share the camera to the other device (1), or, you share a printer and internet access (2).

Which?

If you want to connect Wifibooth to a remote iPhone’s camera with SoloLink (1), keep reading.
If you want to use SoloLink to share a printer or internet access to Wifibooth (2), please see this article instead.

Why?

SoloLink sharing an iPhone camera to Wifibooth on an iPad

A rear-facing iPhone camera is much higher quality than any iPad camera. For this reason alone, using the iPhone camera remotely from the iPad makes sense. But if you have an iPhone with dual cameras (iPhone 8+ or newer), you can also use SoloLink to create effects like green screen (aka magic screen), where the background is replaced even without having a professional/green backdrop behind the guests.

Requirements

  • iOS 12 or newer on both your iPad & iPhone
  • SoloLink installed on your iPhone. It’s free, no sign-up required. App store link: http://itunes.apple.com/app/id1127641254
  • Keep both apps, SoloLink and Wifibooth, updated to the newest versions available on the App Store

To connect your iPhone & iPad:

  1. First, either connect both devices to the same wifi network, or have the iPad connect to your iPhone’s personal hotspot (this will also mean the iPad has internet access, which is necessary for live emails / uploads). Your iPad & iPhone will also connect to each other if wifi is on and both devices are not connected to any network.
  2. On your iPad, in Wifibooth, open the camera popup (near the top-left of the app), and select “Remote iPhone”
  3. On your iPhone, open SoloLink and touch the button to share the camera
  4. Your iPad will find the iPhone and attempt to connect. Your iPhone will ask you for permission for the iPad to connect: grant it with “Always Allow”

That’s it!

On your iPhone, SoloLink offers you the following features:

  • Green Screen effect (replaces the background with a different background). Note that this is only supported on dual-camera devices at least as new as the iPhone 8 Plus, ie. iPhone 8 Plus, iPhone X, iPhone XS, iPhone XS Max or newer. To activate this feature, hit the “Select…” button to choose a new background image. Note: the green-screen effect will only be applied when a person’s face is detected in the frame, and the lighting is good
  • Video resolution: choose the resolution of the live-view feed being sent to your other device. This has no effect on the photos taken. If you experience issues with the live-view / video feed looking blocky or breaking up, then lower the resolution to 480.
  • Flash: choose whether the iPhone flash will fire when a photo is taken
  • Exposure controls: you can lock or unlock the exposure (so that the camera doesn’t change its brightness), and also apply an exposure compensation to make it brighter or darker
  • Save photos to camera roll: by default, all photos taken will be saved to the camera roll on your iPhone. If you don’t want this, set it to “No”.

To conserve your iPhone’s battery, SoloLink will detect when it hasn’t taken a photo in a while, and reduce the frame-rate of the live-video it is sending. As soon as another photo is asked to be taken, or you interact with Wifibooth’s camera controls on the other end, the frame-rate will be reset to its normal rate.

Configure Wifibooth to be a social media booth

Wifibooth has lots of settings to control how photos, collages and GIFs are uploaded to social media. First, let’s discuss how the settings work.

Social Media Settings

Wifibooth supports automatic uploads of both collages and individual photos to Dropbox, Google Drive, and Google Photos.  Automatic here means that the user does not have to choose that this happens. Here’s when the uploads occur:

  • Collages – uploaded when an action is taken upon a collage (from the collage screen). An action is any user-selected action on the collage, such as email, SMS/text, print, etc. Collages are also uploaded if there are no actions are available (for example, because none have been configured) and the user hits the Done button. Finally, if AutoPilot is enabled, then collages are uploaded.
  • Individual photos (aka All photos), includes GIFs – these are uploaded when the photo is received. In other words, when the photo is visible in Wifibooth, then it is already uploaded (or queued for uploading)

How to Configure Wifibooth as a Social Media Booth

If you don’t want to print — you just want single photos uploaded — then use this combination of settings:

  1. If you are not printing, then in the Printer popover make sure the top switch is turned off
  2. In Event Settings, go to the page(s) of the social media settings that you want to enable. First, make sure you are signed in. Then, make sure upload collages is turned on. No need to turn on uploading for All photos, leave that off for now!
  3. In Event Settings, go to the Taking Photos page. Change the number of photos to take to 1. Also, turn on AutoPilot to Full, and in the popup, select Yes to avoid user interaction.

Now when you take photo(s), the collage will just be a single photo, and will be automatically uploaded.

If you want to have collages of more than 1 photo, then change the number of photos to take accordingly, and also turn on uploading of All photos for the social media service(s) you’re using. This will also mean that GIFs get uploaded.

As always, think hard about whether it is safe to upload photos automatically to social media: this makes the photos public immediately. The last thing you want is a drunk guest’s very inappropriate photo published publicly! If you think this is a risk, then only enable uploading of collages, and turn off AutoPilot. This means that only collages that your guests create will be uploaded.

Using SoloLink with Wifibooth to connect your Printer & Internet

Please note: The BluePrint app was renamed to SoloLink in August of 2019

SoloLink is a free app designed to work with Wifibooth. You can get it here: http://itunes.apple.com/app/id1127641254

Prefer to watch a video instead of reading? Use the Related Video link above. Note that the video refers to the older BluePrint app, which was renamed SoloLink.

Overview

To use SoloLink you need two iOS devices: one with Wifibooth or SoloLink (2a or 2b), and one with SoloLink (1). The most common configuration is Wifibooth on an iPad (2a) and SoloLink on an iPhone (1).

With SoloLink you either share the camera to the other device (1), or, you share a printer and internet access (2).

Which?

If you want to use SoloLink to share a printer or internet access to Wifibooth (2), keep reading.
If you want to connect Wifibooth to a remote iPhone’s camera with SoloLink (1), please see this article instead.

Why?

SoloLink sharing a connected printer and internet access to Wifibooth

When the wifi of your iPad is connected directly to your camera, then by default your iPad cannot connect to a printer or use the internet. This is a common problem because only Canon and Panasonic cameras support connecting their wifi to a router (infrastructure mode). Wifibooth works with SoloLink to solve this problem. If you want to share access to a printer or the internet over Bluetooth to Wifibooth, then you must use SoloLink to do this.

When Wifibooth is connected to SoloLink, SoloLink can share its internet connectivity to Wifibooth. This means your emails, Dropbox uploads etc can happen even while your iPad is connected directly to your camera’s wifi.

Requirements

  • A second iOS device with Bluetooth and wi-fi, running iOS 9.0 or newer. That’s basically any iPhone or iPod Touch that you have lying around
  • If you want to connect a printer, it must support AirPrint (ie. Canon Selphy CP910 or newer) or be a DNP printer shared via a DNP WPS product; it must also be connected to the same wifi network as your second iOS device. You can also just share internet access (without a printer).
  • During your event, the iPad and the second iOS device should be reasonably close together (the range of Bluetooth varies, but I wouldn’t expect much beyond about 5 meters or so)

Steps for sharing your Printer and Internet access from SoloLink to Wifibooth

  1. Make sure Bluetooth is turned on, on both your iPad and your second iOS device. You don’t need to connect to anything, or do anything other than make sure Bluetooth is on.
  2. Install SoloLink on your second iOS device. Do not install SoloLink on the same device where Wifibooth is installed. That is not supported. Here’s the app-store link for SoloLink: http://itunes.apple.com/app/id1127641254
  3. If you are connecting a printer with SoloLink, then connect the wifi of your SoloLink device to the same wifi your printer is on. If your SoloLink device is an iPhone, then it is best to use your iPhone’s Personal Hotspot feature and get the printer connected to that. You can tell if the printer is connected to your iPhone’s Personal Hotspot by opening the Personal Hotspot from the Settings App.
  4. Start SoloLink. If you intend to share internet connectivity to Wifibooth, and you are using the Wifibooth Service (for example, to send text/SMS messages with Twilio), then you must sign in to the Wifibooth Service in the SoloLink app with the same email address you used in the Wifibooth app.
  5. In SoloLink touch the appropriate Share button — if applicable share your printer, otherwise share Internet. Sharing a printer also shares the internet. If the app cannot find your printer, make sure the printer is on the same wifi network as your SoloLink device.
  6. Open Wifibooth on your iPad, open the status area (the wifi icon) near the top-right, and touch “To start connecting to SoloLink, touch here”. When prompted with the question “What are you sharing from SoloLink?”, touch the button “Anything Else” to answer. The status area will close itself.
  7. Within a few moments the status area should pop open again because it has found your SoloLink device, and prompt you to connect. If this doesn’t happen, make sure Bluetooth is turned on for both devices, and make sure the devices are reasonably close to each other.
  8. That’s it! If you shared a printer, Wifibooth will automatically add it as the connected printer.

Too slow? Try these tips to make it faster

First, make sure the distance between the two devices with Wifibooth/SoloLink is not too far: aim for 3m or less.
Next, try to remove all obstacles between the two devices (especially dense/moist material like MDF/wood).
If that still doesn’t do it then there are 2 major ways you can speed up printing and internet uploads in Wifibooth when it is connected to SoloLink.

Upgrade both devices to Bluetooth 5

With each major revision of Bluetooth, there are significant speed increases. From Bluetooth version 4 to 5 you could see as much as double the speed. You’ll only get this speed if both devices are Bluetooth 5 (there’s no advantage in only one side supporting Bluetooth 5). On the iPad side, this requires a newer iPad like the iPad Pro 11″. On the iPhone side an iPhone 8 or newer has Bluetooth 5. If in doubt just look at the technical specifications for your iOS device on Apple’s website. There is no way to upgrade the Bluetooth version of a device (it is stuck on whatever it comes with).

Reduce the amount of data that Wifibooth sends to SoloLink

If you don’t require it, turn off SoloLink’s internet sharing (on the printer sharing screen). This will cause Wifibooth to store its internet uploads for later (they’ll automatically upload when Wifibooth detects direct internet access). This will considerably reduce the amount of data being sent over the Bluetooth link, thus speeding up printing via SoloLink.

You should also reduce the print DPI by going to Event Settings, Layout & Collages, and reducing the dots per inch (DPI) — try going from 300 to 150. This will lead to slightly reduced print quality, but you might not even be able to notice it — and you’ll be sending half as much data, ie. a speed boost of 2x.

How Wifibooth and SoloLink handle queueing

When SoloLink is connected to Wifibooth, Wifibooth will always use the internet connection it has through SoloLink first. If you’re uploading a lot (ie. Dropbox uploads turned on, Email on, etc) and printing a lot at the same time, you might find that the prints take a while to get sent. Wifibooth does prioritize the prints ahead of any other uploads (prints jump to the front of the queue), but Wifibooth does not interrupt an upload-in-progress when a print is ordered. SoloLink caches photos that it receives, so if someone prints a photo a second time, it is not retransmitted across the Bluetooth link.

What happens if there’s a bunch of stuff being sent by Wifibooth to SoloLink, and at the same time someone prints another photo? Wifibooth and SoloLink handle this by queueing items. In order to make Wifibooth reliable, this queue is tough: it can handle the Bluetooth connection being lost and then reconnected, or one side disappearing – for example your iPhone runs out of battery, you plug it in, and start up SoloLink again. This queue will automatically resume once a connection is (re)established. Please note that the contents of this queue cannot be viewed — it is not the same as what you see on the Event Picker screen.

If you get stuck, please visit the Community — someone will help you!

Printing with Wifibooth

Wifibooth is built to get your guests’ creations printed out as quickly and easily as possible!

Prefer to watch a video instead of reading? Use the Related Video link above.

If your iPad is connected directly to your camera’s wifi (ie. your camera is making the wifi hotspot that you connect to), then your printer and your iPad are NOT on the same wifi network, because your camera will only let the iPad connect. This means you won’t be able to add the printer directly in Wifibooth – nothing will show up in the list of printers.

So what can you do?

First, if you’re lucky enough to have a camera that supports connecting to other wifi networks, like Canon and Panasonic cameras, then you can use “infrastructure mode” wifi to tell your camera to connect to a wifi router instead. That’ll mean that you end up with your iPad, camera, and printer all on the same wifi network. Learn more about connecting your Canon camera to a router here.

If you don’t have a camera that can connect to other wifi networks, don’t sweat it! That’s why SoloLink was created. SoloLink (formerly called BluePrint) is a free app that lets you use a second iOS device, usually your iPhone (even an old one will work!), to share your printer and internet via bluetooth. Go to the SoloLink article to learn more.

Printer Settings

There are two places in Wifibooth where there are settings that affect printing: on the printer page itself, and in the event settings.

After you connect a printer, you can see the printer settings on the printer page. Here you can set the following:

  • Whether the guest can print from the gallery screen. If your guests are printing too many photos, try turning this off.
  • The text the user sees after printing. For example, you can tell your guests to write something under the photo or print an extra copy for the bride
  • Insets. These are very small adjustments to the printed image, in case you have a printer that “zooms” (overscans) everything that it prints. Canon Selphy printers are infamous for doing this. If you’re finding that your logo gets cut at the bottom or top of the print, try using the following inset settings for your Canon Selphy printer: Left 32, Right 37, Top 52, Bottom 55. Thanks to Wifibooth Community user Cranfan for these

The other page of settings that matters for printing is the Layout & Collages settings page, which is found in event settings. Here you can set the following:

  • The orientation for collages. This defaults to automatic, which means Wifibooth will guess the best orientation based on the photos selected for printing. Important: if your printer cuts the paper itself, choose “2 Strips”. If your printer is a roll printer, meaning the paper comes in a roll instead of in sheets, then select “1 Strip Roll Printer”.
  • Size. This has two important impacts: the aspect ratio of the collages, and the resolution of photos that Wifibooth creates. The default is 4×6″. If your printer is loaded with 5×7″ paper, things are not going to look good! Set this to the right size for the paper in your printer. Together with the DPI setting, this setting controls the resolution (pixels) of photos when they are printed: at the default of 4×6 at 300 DPI, the resolution of created photos is (4 x 300) by (6 x 300) pixels = 1800x1200 pixels for a photo in landscape orientation.
  • Borders. These allow you to customize the look of your prints – adjust them to your taste. Note that the last “photo borders” setting adds an extra border to the outer edge of each photo, whereas the other border settings simply increase the spacing to let the background show through.
  • Background. You can choose a background color, or a photo. For the photo, you can choose how it appears if it isn’t exactly the same aspect ratio as your paper size. Choose “scaled (keeping aspect ratio)” if the background photo has objects like people in it. Choose “not scaled” if you’re picking a repeating pattern etc. Note: don’t pick a huge background photo! It should be close to your printing resolution (see above). If you pick a background photo that’s too big, ie. 4000 x 3000 pixels, Wifibooth might run really slowly or even crash on older iPads.

Supported Cameras

Wifibooth is free to try, and all features work before purchase: please make sure Wifibooth works well with your camera before purchasing. Please note that a camera being on this list does not guarantee that it can do everything (for example, autofocus), nor is it a guarantee that it will work for you (differing hardware variants, firmware versions that cannot always be updated, etc).

Wired / USB

New in Wifibooth 4.12.0 is support for connected cameras with USB. Both lightning-to-USB and USB-C-to-USB cables/adapters are supported. Please note that your iOS device must be running iOS 14.2 or newer for wired/USB connectivity.

All Canon EOS (DSLR) cameras, including mirrorless cameras like the Canon M50. PowerShot cameras are not supported for wired/usb.


Wifi

Does your camera have wifi? Great! If it’s on the list below, it is supported with Wifibooth. If it’s not on the list, let us know in the Community forums that you want support added.

Canon	EOS R					
Canon	EOS R5					
Canon	EOS R6					
Canon	EOS RP					
Canon	EOS 1D X Mark II					
Canon	EOS 5D Mark IV					
Canon	EOS 5D S (with W-E1)					
Canon	EOS 5DS R (with W-E1)					
Canon	EOS 5D Mark III (with WFT-E7)					
Canon	EOS 6D Mark II					
Canon	EOS 6D					
Canon	EOS 7D Mark II (with W-E1)					
Canon	EOS 90D					
Canon	EOS 80D					
Canon	EOS 70D					
Canon	EOS 77D					
Canon	EOS 850D, T8i					
Canon	EOS 800D, T7i					
Canon	EOS 760D, T6s					
Canon	EOS 750D, T6i					
Canon	EOS 1300D, T6					
Canon	EOS 2000D, T7					
Canon	EOS 4000D, T10					
Canon	EOS SL2, 200D					
Canon	EOS SL3, 250D					
Canon	EOS M50 Mark II					
Canon	EOS M50					
Canon	EOS M6 Mark II					
Canon	EOS M6					
Canon	EOS M5					
Canon	EOS M3					
Canon	EOS M200					
Canon	EOS M100					
Canon	EOS M10					
Canon	EOS M2					
Canon	PowerShot G1X Mark III					
Canon	PowerShot G7X Mark II					
Canon	PowerShot G9X Mark II					
Canon	PowerShot SX740 HS					
Canon	PowerShot SX730 HS					
Canon	PowerShot G1X Mark II					
Canon	PowerShot G3 X					
Canon	PowerShot G5 X					
Canon	PowerShot G7 X					
Canon	PowerShot G16					
Fujifilm	X-Pro3					
Fujifilm	X-Pro2					
Fujifilm	X-E3					
Fujifilm	X-E2S					
Fujifilm	X70					
Fujifilm	X-H1					
Fujifilm	X-T4					
Fujifilm	X-T3					
Fujifilm	X-T30					
Fujifilm	X-T2					
Fujifilm	X-T20					
Fujifilm	X-T1					
Fujifilm	X-T10					
Fujifilm	X30					
Fujifilm	X100V					
Fujifilm	X100F					
Fujifilm	X100T					
Fujifilm	X-A3					
Fujifilm	X-A10					
Fujifilm	X-E2					
Fujifilm	FinePix F1000EXR					
Fujifilm	FinePix S1					
Fujifilm	FinePix XP90					
Fujifilm	FinePix XP80					
Fujifilm	FinePix S9900W					
Fujifilm	FinePix S9950W					
Nikon	Z6					
Nikon	Z7					
Nikon	Z50					
Nikon	D3200 (with WU-1a)					
Nikon	D3300 (with WU-1a)					
Nikon	D5200 (with WU-1a)					
Nikon	D5300					
Nikon	D5500					
Nikon	D5600					
Nikon	D7100 (with WU-1a)					
Nikon	D7200					
Nikon	D7500					
Nikon	D500					
Nikon	D600 (with WU-1b)					
Nikon	D610 (with WU-1b)					
Nikon	D750					
Nikon	D780					
Nikon	D850					
Nikon	Df (with WU-1a)					
Olympus	OM-D E-M1X					
Olympus	OM-D E-M1 Mark III					
Olympus	OM-D E-M1 Mark II					
Olympus	OM-D E-M1					
Olympus	OM-D E-M5 Mark III					
Olympus	OM-D E-M5 Mark II					
Olympus	OM-D E-M10 Mark IV					
Olympus	OM-D E-M10 Mark III					
Olympus	OM-D E-M10 Mark II					
Olympus	OM-D E-M10					
Olympus	PEN F					
Olympus	TG-4					
Olympus	TG-5					
Olympus	PEN E-PL8					
Olympus	PEN E-PL7					
Olympus	PEN E-P5					
Olympus	STYLUS 1					
Olympus	STYLUS 1s					
Olympus	SH-1					
Olympus	SH-2					
Panasonic	DC-G9					
Panasonic	DC-GH5					
Panasonic	DMC-GH4					
Panasonic	DMC-G90, G91, G95					
Panasonic	DC-GF9, GX800, GX850					
Panasonic	DMC-G80, G81, G85					
Panasonic	DMC-GX7II, GX80, GX85					
Panasonic	DMC-GX9					
Panasonic	DMC-GF8					
Panasonic	DMC-GX8					
Panasonic	DMC-GX7					
Panasonic	DMC-G7, G70					
Panasonic	DMC-GF7					
Panasonic	DMC-GM5					
Panasonic	DC-FZ80, FZ82					
Panasonic	DMC-FZ2000, FZ2500					
Panasonic	DMC-LX9, LX10, LX15					
Panasonic	DMC-TZ100, TZ101, ZS100, TZ110, ZS110					
Panasonic	DMC-TZ80, TZ81, ZS60					
Panasonic	DMC-FZ300, FZ330					
Panasonic	DMC-TZ70, TZ71, ZS50					
Panasonic	DMC-TZ57, TZ58, ZS45					
Panasonic	DMC-SZ10					
Panasonic	DMC-LX100					
Panasonic	DMC-FZ1000					
Panasonic	DMC-GM1S					
Panasonic	DMC-TZ55, TZ56, ZS35					
Panasonic	DMC-TZ60, TZ61, ZS40					
Panasonic	DMC-SZ8					
Panasonic	DMC-G6					
Panasonic	DMC-LF1					
Panasonic	DMC-GF6					
Panasonic	DMC-GM1					
Sony	α9					
Sony	α7					
Sony	α7 II					
Sony	α7 III					
Sony	α7R					
Sony	α7R II					
Sony	α7R III					
Sony	α7S					
Sony	α7S II					
Sony	α5000					
Sony	α5100					
Sony	α6000					
Sony	α6300					
Sony	α6400					
Sony	α6500					
Sony	α6600					
Sony	HX-60					
Sony	HX90					
Sony	HX400					
Sony	NEX-5R					
Sony	NEX-5T					
Sony	RX1R II					
Sony	RX10 II					
Sony	RX10 III					
Sony	RX100 III					
Sony	RX100 IV					
Sony	RX100 V					
Sony	WX500


If you see the camera on this list but have trouble connecting, please follow these steps:

    1. Make sure Wifibooth is not running (ie. kill it if it is)
    1. Go to Settings App -> Wifibooth, turn on the setting “Slow camera”
    1. Try to connect Wifibooth again

If you have a Fuji camera, please note: when you go to the fuji camera’s wifi screen, make sure you hit MENU/OK to forget the last pairing the camera had.

How to stop guests from changing settings or leaving the app

Restricting access inside Wifibooth

Before we get to preventing guests from leaving the app, first let’s configure Wifibooth with a password so that guests cannot change event settings while you’re in the middle of an event:

  1. Open Event Settings
  2. Go to General page (near the top)
  3. Set an “Admin area password”

Now whenever you enter event settings, or camera or printer settings, you’ll be prompted for this password. Don’t forget it, or you’ll need to nuke your primary residence from orbit as there’s no way to reset it.

Guided Access

Did you know that iOS has a feature built into it that you can use to stop guests from leaving Wifibooth?
It’s called Guided Access, and it solves a whole bunch of problems including guests accidentally swiping open Notification Center (from the top), or Control Center (from the bottom). It disables the home button but makes it still easy for you to get out of the app if you need to, by triple-pressing the home button and entering a password.

How to turn it on

  1. Open the Settings App, touch General, then touch Accessibility
  2. Scroll to the very bottom of the Accessibility list, to find Guided Access near the bottom
  3. Turn on Guided Access. You’ll be prompted to make a passcode
  4. Open Wifibooth
  5. Activate Guided Access by pressing the home button three times in a row. Now guests can’t hit the home button or use notification center! To turn off Guided Access, touch the home button three times in a row again.

Important!

In iOS 12 there is a bug that can cause the screen to go black / off after 10-20 mins, even if you have set this to “never”, if guided access is active.

As of iOS 12.1.1 there is a workaround: set Settings app -> General > Accessibility > Guided Access > Mirror Display Auto-Lock > ON.

Wifibooth In-App Purchase Plans

Trial-mode watermarks are permanent!

Before you make a purchase, Wifibooth adds watermarks to the photos. There is absolutely no way to remove these watermarks from the photos: you must purchase the app before your event. If you are seeing watermarks, do not take photos at your event! After you make a purchase, simply check that you can now take photos without watermarks being added.

Help, I am having trouble purchasing the plan I want!

Please go here.

Do you have a free plan?

Wifibooth doesn’t have a free plan, but our newer app Booth.Events for iPad & iPhone does have a free plan.

What plans are available?

There are three plans available. Selfie and Selfie+ are one-time purchases, Pro is a subscription.

Selfie Selfie+ Pro
Take photos, GIFs, boomerangs, & videos
Direct Printing
Brand & customize the app and photos
Cloud Storage
Social integration
Share to your guests

What’s in each plan?

Selfie Selfie+ Pro
Take photos with iPad or iPhone camera, no watermarks
Use SceneSelect for green-screen effects without a special background
Connect to a remote iPhone camera using SoloLink, no watermarks
Connect to your Camera's built-in wifi, no watermarks. See list of supported cameras
Animated MP4s / GIFs are made automatically for your guests
Adjust Camera settings like photo mirroring, and Collage settings like background color or photo
All photos saved to Camera Roll
Play slideshows on Smart TVs, Apple TV, or the Soloslides App - learn more
Remote-control your iPad with iPhones, iPods, and Apple Watch to trigger your camera directly
Event Management: multiple events with different settings, photo albums, etc
Direct Printing via AirPrint, BluePrint, FTP, and to supported DNP WPS products
FTP Server: upload photos directly into the app
Dropbox, Google Drive, Google Photos: auto-upload collages, MP4s/GIFs, or all photos
Send photos via text (SMS or MMS) with Twilio
Branding: add your logo to photos, to your guests' iPhone/iPod app, to emails, to the homescreen of the app
Create beautiful wordmarks without leaving the app
Email: collect email addresses, live-send email to your guests with either a Dropbox link, or the photo directly attached
Offline support: emails, texts, Facebook, Google, and Dropbox uploads will queue while your iPad is offline, automatically send once online
Available as a... One-time purchase One-time purchase Monthly or yearly subscription
PRICE - click the link to App Store listing, scroll down to Information section to see the price in your currency App Store App Store App Store

The Small Events plan was renamed to Selfie+.

The SoloLink iOS app is free: it can use your iPhone as a remote camera or share internet to Wifibooth via Bluetooth.

The SoloSlides iOS app is free, with an affordable one-time in-app purchase if you require its pro features. It displays a slideshow from Wifibooth on a second iOS device.

Please note that there may be differences between the iPad and iPhone versions of the app. Make sure you try out the features you want to use, before making a purchase.

Please don’t make a purchase until you know the app works for you.

Before you purchase the app there are no limitations beyond watermarks, the nag screen, and photo downsizing. So if the app is not connecting to your camera, or some other functionality is not how you expect, then please post on the community forums to get answers to your questions before purchasing.

Where can I see the prices of these plans?

Open the App Store listing and look in the “Information” section for the list of available In App Purchases and their prices in your currency.

What’s a subscription? Why would I want that?

The PRO plan is sold as an auto-renewing monthly or yearly subscription through Apple. Apple will automatically attempt to renew the plan 24 hours before the end of the period (so, one day less than a year after you buy it). You can cancel your subscription at any time – see the unsubscribe info at the bottom of this page.

I bought this on my iPhone, how can I get it on my iPad without paying again?

You can restore your purchase on any devices that are signed in with the same Apple ID (see Settings App -> iTunes & App Store). See the next answer for how to restore your purchase.

I had to wipe my iPad, and now my purchase is gone!

Hit the Restore Purchase button. This is located on the plans screen, which you can get to by opening Event Settings -> General page, and hitting the “Show Plans” button.

The app will check to see if you bought any plans, by connecting to Apple and examining your in-app purchases. You may be prompted to sign-in with your Apple ID. Make sure you use the same Apple ID that you used to purchase the plan! If you purchased a plan and it doesn’t restore properly, check the Apple ID you are signed in with: go to the Settings App -> iTunes & App Store and check the signed-in Apple ID there.


I am unable to purchase Pro or another plan, there’s an error!

If you experience an error trying to make a purchase then please try these steps before you contact us:

  1. Open Settings App, go to iTunes & App store, touch the Apple ID at the top and choose Sign Out
  2. Power the device right down – hold down power button and swipe to power off. If you have a newer device like the iPad Pro with Face ID then you need to hold down both the power and the volume up buttons at the same time.
  3. Power back on, go back to the Settings App, iTunes & App store and sign in again. Look for any errors or warnings from Apple when you sign in: you might need to update your credit-card information or re-enter your credit-card’s CVV code, or you might need to accept an updated agreement from Apple to be able to make purchases.

Now you’re ready to try purchasing Wifibooth again.
If you continue to see the error, please follow the instructions on
this Apple webpage. If you do end up needing to contact Apple Support, don’t fear – they’re very good at helping you give them your money! If all else fails, please get in contact with us on the Community and we’ll help you.


How do I unsubscribe from Wifibooth Pro?

Please follow this link to Apple to manage your subscriptions (including Wifibooth Pro).

You can also do this in Wifibooth: on the Wifibooth purchase screen (Event Settings -> General -> Show plans), if you have purchased Pro then at the bottom you’ll see the button “Manage Subscriptions”. When you touch that, you’ll be directed to exactly the right spot in Apple-land where you can cancel or change your subscription.

Branding: how to brand your event

Want to get your name, logo, and brand visible to your guests using your photobooth? Wifibooth has got you covered. Wifibooth supports logos in PNG and JPG formatted. PNG is recommended.

Branding your Event

Logo in Collages

By creating a logo that is added to collages, guests will see your logo on the iPad, in prints, in photos saved to Dropbox, tweets, and so on.

First, prepare your logo: it should be a PNG, transparent if you are not printing with a white background, cropped to its actual dimensions, and with a resolution that you are using to print with (ie. 4×6″ at 300dpi is 4*300 = 1200 pixels by 6*300 = 1800 pixels, so as close to 1200×1800 pixels as the logo’s aspect ratio allows. Don’t make it too big or your iPad will have to work really hard every time someone touches the screen to change a collage.

Next, get the logo on your iPad, and save it to your Camera Roll. You can do this by emailing the logo to yourself on the iPad, or by using AirDrop, or Dropbox etc.

Finally, configure Wifibooth to use your logo: in the Event Details pane, scroll down to Add Logo to Collages touch the placeholder image, and select your logo. Now you need to configure the other options available to you:

  • In Collage – logo will be added as if it were one of the selected photos:
  • Top / Bottom – logo will be added in an area above or below the collage. The size of this area is configurable by the slider marked Logo size.
  • As Overlay / Watermark – see section below titled “Overlay (Watermark) on Collages”

Please note that while Landscape paper orientation is selected, the only available logo option is In Collage. If you cannot select other logo options, then change the paper orientation first.

Overlay (Watermark) on Collages

You can also choose to show an image drawn on top of the collage, ie. like a watermark. To do this, in the Event Details screen, touch the placeholder image under Overlay on Collages. You’ll first be prompted to pick the image you want to show (from the iPad Camera Roll). Next, you need to configure its position:

  • Maximized – if you want to show the image as big as it can be (ie. the full dimensions of the collage), then near the top-right, hit the Maximized button. You’ll then need to choose if you want the image to be stretched (ie. an image of a “frame”), or keep its aspect ration (ie. a logo).
  • In position – you can pinch to zoom and drag to move the image to where you want it to be drawn on the collage. Note that the relative position of the image to the 4 corners, and midpoints of the sides is used to calculate how the image should be drawn as an overlay: for example, if the image is closest to the bottom-left corner, then the relative percent of the image’s distance from the bottom-left corner is used.

Email

If you configure Wifibooth to send emails to your guests, then you can add a custom logo to these emails. To do this, you first need to upload your logo to your webhost, and get the link to it (ie. http://mysite.com/mylogo.png). Put this link in the Event Settings -> Email -> “Custom logo image URL” field. You can send a test email from the Email event settings page to check if it is working.

For help configuring email, please see the separate article Configure Wifibooth to email your guests.

Configure Wifibooth to email your guests

This article will help you understand how to configure Wifibooth to send email to your guests, and the choices for email content. Wifibooth is designed to help you get your guests’ photos on your guests’ devices as quickly as possible!

Prefer to watch a video instead of reading? Use the Related Video link above.

You choose the behaviour for email in the email page of the event settings, shown here:

Here’s an explanation of what these mean:

  • Off – guests cannot enter their email addresses
  • Only Save – guests enter their email addresses, but no email is sent. The app collects the email addresses, and after the event is over you manually send email to these addresses.
  • Dropbox Link – as soon as a guest enters their email address, Wifibooth will upload the chosen collage to Dropbox, and email the guest with a link to the collage and to the album where the collage is stored. This option requires you to first set up your SMTP settings (see below) and Dropbox on the Dropbox settings page. Email addresses are also stored as they are with Only Save (see above)
  • As Attachment – as soon as a guest enters their email address, Wifibooth will send an email to the guest with the chosen photo attached. This option requires you to first set up your SMTP settings (see below). Email addresses are also stored as they are with Only Save (see above)

There’s also an option (near the bottom) to force guests to enter their email address in order to perform other actions, like printing. If you turn this on, the order of the actions is reversed: normally, printing happens first so that the time the printer spends printing out the photo is offset by the time the user spends entering their email address; when users are forced to enter their email address, then they are prompted before other actions like printing occur.

Getting Email Addresses that have been entered into Wifibooth

To retrieve the email addresses, first make sure you have the right event open.

Then open Event Settings, and then the Sharing Center, as shown in the picture below.

To resend an email (ie. because you have changed your email settings), use the “Resend” button next to the address of your choice.

To retrieve an email address or all e-mail addresses, touch “N email addresses”. You are then presented with the choice of interacting with an individual address, or you can open all addresses (you will be prompted to choose the separator used between email addresses, which depends on which email client you use).

To clear all email addresses for the current event, touch “N email addresses” (in the Sharing Center) and choose the option “Clear Email Addresses” (in red).

Configuring Wifibooth to Send Email

Wifibooth connects to your email account to send email as you, so that the guests receive email from you (the event organizer). In other words, it needs access to your email account. You can use any email account, ie. you can set up myphotobooth@myawesomecompany.com for this purpose. Or you could create a new GMail account just for your Wifibooth events.

Wifibooth has two ways of setting up an email account:

  1. For email accounts hosted on Google such as GMail, G-Suite, and other Google-hosted email accounts, do not enter a password; rather, Wifibooth will help you authenticate to Google directly.
  2. For all other email accounts (any email account not hosted by Google), you need to provide an SMTP username and password to access the account

To configure email, follow these steps:

  1. On the Email page of the event settings, configure your email settings:
    • EMail SMTP server: The SMTP server is the server that Wifibooth will connect to, to send email. The default is correct for Google-hosted accounts (GMail, G-Suite, etc): smtp.gmail.com. If you are not using a Google-hosted account, ask your email service provider for the SMTP server hostname.
    • EMail SMTP port: The port to connect to the SMTP server on. This is tied with the connection type setting – if you change the connection type setting, then you probably need to change this too. The default of 465 should be correct for most email accounts (including Google-hosted accounts), because it is the default port for TLS/SSL connections.
    • EMail SMTP username: Enter your username. For Google-hosted accounts: if your email address is myname@gmail.com, then your username is only myname. If you’re not using a Google-hosted account, note that your username is not necessarily the same as the first part of your email address; contact your email service provider if you’re unsure.
    • EMail SMTP password: If you are using a GMail or Google-hosted email account, you should leave this blank because you’ll be prompted to authenticate with Google when you close the event settings; otherwise, enter your SMTP password (the password you use to send email). If you’re not sure, please contact your email service provider.
  2. If you want to customize the logo that is shown in the email sent to guests, then upload your logo to your webserver, and enter the web-address (e.g. http://link/to/myimage.jpg) to the logo in the field “Custom Logo Image URL”. Keep in mind that this URL must be to a photo, and must be publicly accessible. The photo should be at most 375×100 pixels in size. You can safely leave this field blank.
  3. If you want to customize the background image shown in the email, then upload your background image to your webserver, and enter the web-address in the field “Background photo”. The default value is http://wifibooth.com/assets/emailbg375px.jpg, and the background photo must be 375×536 pixels. Don’t forget to upload @2x and @3x versions also.
  4. If you want to customize any of the text such as the email subject, body, or the prompts shown to the user, then change these settings now. Use of emoji is supported.
  5. At the top of the page, reselect the desired email option (Dropbox Link or As Attachment), and touch the button “Test Email“.
  6. You’ll be asked if your email account is hosted on Google (ie. GMail, or other Google-hosted email account setups). If it is, say Yes, and authenticate with Google when asked. By doing so you are giving Wifibooth access to your Google email account, so that it can send email. Wifibooth does not read your email, it only sends.
  7. In the Wifibooth app, you’ll be prompted to enter an email address for testing; enter one where you can receive email. It’s ok to use the same one you are sending from. If your settings are correct, you’ll briefly see a checkmark, and then receive a test email at the given address. If not, you’ll get a pop-up.

Need to reauthenticate with Google?

If you logged in with a Google account there’s no obvious “sign-out” button, but there are two things you can do to sign-out:

  • To stop Wifibooth from using your Google email account, log in to Google, go to My Account, Connected Apps & Sites, Manage Apps, and remove Wifibooth.

Offline Support

If you don’t have internet connectivity at your event, don’t sweat it! Wifibooth’s got you covered. Uploading photos to Dropbox (collages and individual photos), sending Dropbox-link emails, and sending emails with photos attached now functions while your iPad is offline (version 3.3 or newer required). You can also create new Dropbox-enabled events while offline. Here are the important considerations:

  • The first time you ever enable Dropbox for any event, you must sign into Dropbox and this requires an internet connection. You only need to do this once.
  • The first time you set up a GMail or Google-hosted email account, you must have internet access. You only need to do this once.
  • If you don’t have much space free on your iPad, you can get into trouble. As guests save collages, photos, or send emails, these are being saved to disk (including the photos themselves) inside the Wifibooth app. Wifibooth shows you how much space is free when the app is first started, in the bottom-right corner.
  • To get the offline stuff to send, all you have to do is make sure your iPad has an internet connection, open Wifibooth (it does not matter whether the app was already running or not), and make sure you’re on the main screen (ie. some event is selected — it does not matter which). Wifibooth will automatically detect internet connectivity, and start sending all stored offline content from all events. Don’t close Wifibooth until it is done: you can check the progress on the start screen where you choose the event. Or, in the top-right corner touch the wifi icon for more details.
  • If emails get stuck and don’t send, try sending a test email from Event Settings -> Email, as this can refresh your credentials and get things moving again.